This fitting instruction applies to Oral Mart mouth guards below: Youth (Strapless) / Youth (Strapped) / Adult (Strapless) / Adult (Strapped)
Note: This fitting guide will show you how to mold a mouthguard with hot water (NOT with microwave), which gives you best results.
FAQs Before You Start
Now Let’s Get Started!!
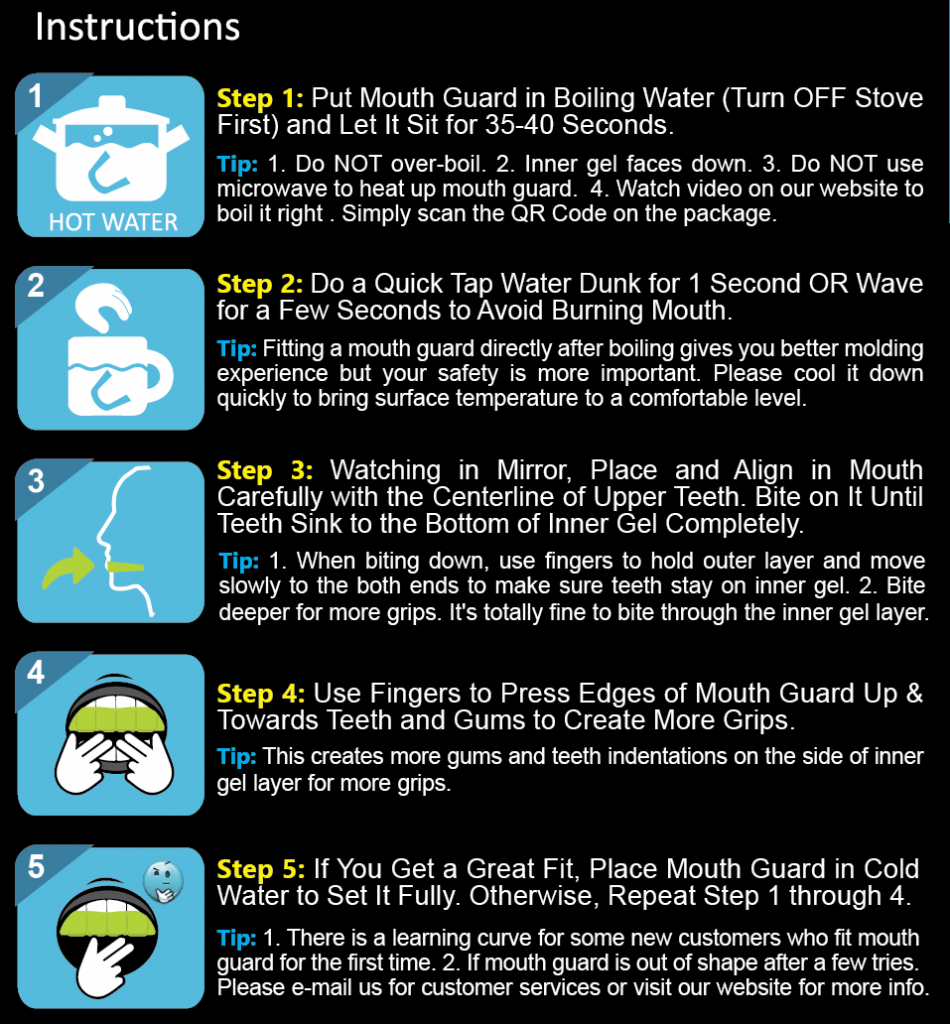
5 Easy Steps to Fit Your Oral Mart Sports Mouth Guard Right
✅ STEP 1
Bring water to a rolling boil and turn OFF the stove. Put mouth guard in the boiled water and let it sit for 40 Seconds.
Tips: 1). Do NOT over-boil. 2). Inner gel faces down. 3). Do NOT use microwave to heat up mouth guard. 4). Boiling it right is extremely important so please make sure you watch instructional video below to boil it right.
Note: If it’s a “strapped” mouth guard, you can simply hold the mouth guard carefully by the end strap. Below is the video to boil it right.
✅ STEP 2
Do a Quick Tap Water Dunk for 1 Second “OR” Wave for a Few Seconds to Avoid Burning Mouth. (Cooling Down Too Much Will Affect Your Fitting Experience Dramatically)
Tip: Fitting a mouth guard directly after boiling gives you the best molding experience BUT your safety is more important. Please cool it down quickly only to bring surface temperature to a comfortable level. DON’T cool down too much as your fitting experience will be greatly affected.
✅ STEP 3
Watching in Mirror, Place and Align in Mouth Carefully with the Centerline of Upper Teeth. Bite on It Until Teeth Sink to the Bottom of Inner Gel Completely.
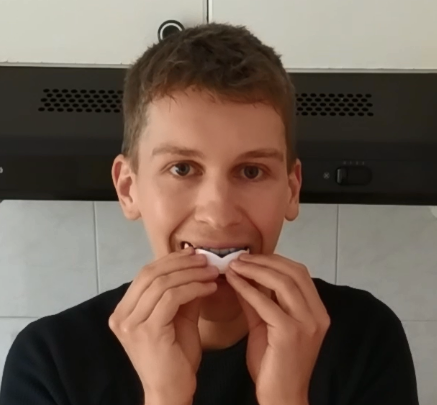

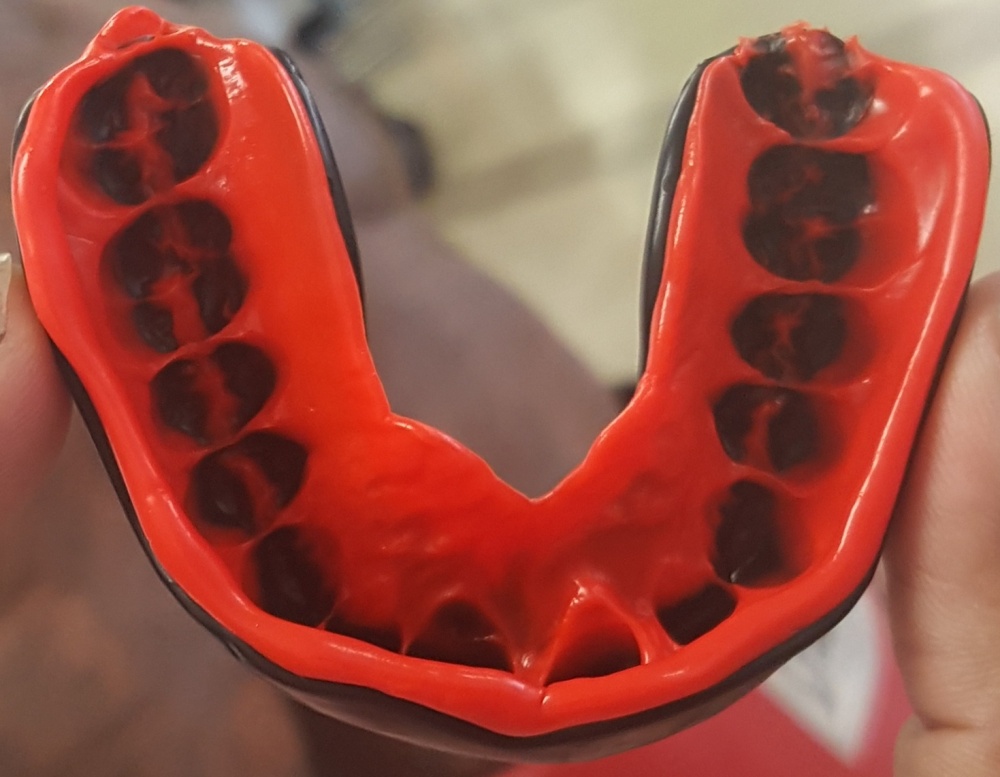
Tips: 1). When biting down, use fingers to hold outer layer and move slowly to the both ends to make sure teeth stay on inner gel. 2). Bite “deeper” for more grips. It’s totally fine to bite through the inner gel layer.
✅ STEP 4
Use Fingers to Press Edges of Mouth Guard Up & Towards Teeth and Gums to Create More Grips.
Tip: This creates more gums and teeth indentations on the side of inner gel layer for more grips.

✅ STEP 5
If You Get a Great Fit, Place Mouth Guard in Cold Water to Set It Fully. Otherwise, Repeat Step 1 through 4.
Tips: 1) There is a learning curve for some new customers who fit mouth guard for the first time. 2). If mouth guard is out of shape after a few tries. Please contact us for customer services.
✅ Remember, we are here to help!!


5 einfache Schritte, um Ihren Oral Mart Sports Mundschutz zu formen
1) Stellen Sie den Oral Mart Sportmundschutz in kochendes Wasser (schalten Sie den Ofen zuerst aus!) und lassen Sie ihn 40 Sekunden lang stehen. (Tipp: Nicht überkochen. 40 Sekunden ist lang genug.) Hinweis: Wenn es sich um einen umreiften Mundschutz handelt, lassen Sie den Riemen aus dem kochenden Wasser.
2) Legen Sie den Mundschutz für 1-2 Sekunden in kaltes Wasser, um ein Brennen des Mundes zu vermeiden (Tipp: Damit heißes Wasser nicht Ihren oder den Mund Ihres Kindes verbrennt.)
3) Vom Wasser entfernen. Platzieren und ausrichten in Ihrem Mund. (Tipp: Verwenden Sie beim Beißen sowohl Daumen als auch Zeigefinger, um die äußere Schicht zu halten, und bewegen Sie sich langsam zu beiden Enden, um sicherzustellen, dass Ihre Zähne vollständig auf Kurs bleiben auf dem inneren Gelteil.)
4) Beißen Sie den Mundschutz und saugen Sie Wasser und Luft aus ihm heraus. Lassen Sie es 10 Sekunden lang im Mund. (Tipp: Es ist völlig in Ordnung, durch die innere Gelschicht zu beißen.)
5) Drücken Sie mit den Fingern den Mundschutz gegen Ihre Zähne (Tipp: So hat er auch an der Seite mehr Halt.)
6) Wenn Sie keine gute Passform haben, wiederholen Sie die Schritte 1 bis 5 erneut. (Tipp: Es kann eine gewisse Lernkurve für einige neue Kunden/Eltern geben. Beantworten Sie einfach diese Nachricht, wenn wir Ihnen helfen können.)
5 étapes faciles pour mouler votre Protège-dents de sport Oral Mart
1) Mettez le protège-dents Oral Mart dans de l’eau bouillante (Éteignez d’abord la cuisinière !) et laissez-le reposer pendant 40 secondes. (Astuce: Ne le faites pas trop bouillir. 40 secondes, c’est tout ce dont vous avez besoin.) Remarque : S’il s’agit d’un protège-dents cerclé, laissez la sangle hors de l’eau bouillante.
2) Placer le protège-dents dans de l’eau froide pendant 1 à 2 secondes pour éviter de se brûler la bouche.(Astuce: Pour que l’eau chaude ne brûle pas votre bouche ou celle de vos enfants.)
3) Retirer de l’eau. Placez et alignez dans votre bouche. (Astuce: Lorsque vous mordrez vers le bas, utilisez vos pouces et vos index pour tenir la couche externe et déplacez-vous lentement vers les deux extrémités pour vous assurer que vos dents restent complètement alignées, sur la partie interne du gel).
4) Mordez le protège-dents et aspirez l’eau et l’air qui s’y trouvent. Laisser reposer 10 secondes dans la bouche. (Astuce: Il n’y a aucun problème à mordre à travers la couche de gel interne.)
5) Utilisez vos doigts pour presser le protège-dents contre vos dents.(Astuce:afin qu’il ait donc plus d’adhérence sur le côté aussi.)
6) Si vous ne sentez pas que le résultat est parfait, répétez les étapes 1 à 5. (Astuce: Il peut y avoir une certaine courbe d’apprentissage pour certains nouveaux clients/parents. Répondez simplement à ce message si nous pouvons vous aider.)
5 Semplici Passaggi per Modellare il Paradenti Sportivo OralMart
1) Immergi il paradenti sportivo OralMart in acqua bollente (SPEGNIprima il fornello!) e lascialo riposare per 40 secondi. (Suggerimento: non bollirlo troppo. 40 secondi è esattamente il tempo ciò che serve.) Nota: se si tratta di un paradenti a strappo, premurati di lasciare la cinghia fuori dall’acqua bollente.
2) Metti il paradenti in acqua fredda per 1-2 secondi per evitare di bruciarti la bocca (Suggerimento: in questo modo l’acqua calda non brucerà la bocca tua o dei tuoi figli).
3) Rimuovilo dall’acqua. Posiziona e Allinea in bocca. (Suggerimento: quando mordi verso il basso, utilizza sia il pollice che l’indice per tenere fermo lo strato esterno e spostarti lentamente su entrambe le estremità per assicurarti che tutti i denti restino inclusi nella parte interna del gel.)
4) Mordi il paradenti e fai uscire acqua e aria. Lascialo in bocca per 10 secondi. (Suggerimento: è assolutamente OK mordere lo strato di gel interno.)
5) Usa le dita per premere il paradenti contro i denti (Suggerimento: in questo modoavrà una presa maggiore anche sui lati.)
6) Se non riesci ad adattarlo perfettamente, ripeti i passaggi da 1 a 5. (Suggerimento: alcuni nuovi clienti / genitori potrebbero avere difficoltà per la loro prima volta. Semplicemente “Rispondi” a questo messaggio per ottenere assistenza).
5 pasos fáciles para moldear su Protector Bucal Deportivo Oral Mart
1) Pon el protector bucal deportivo Oral Mart en agua hirviendo (¡Apague la estufa primero!) y déjelo reposar durante 40 segundos (Consejo:No te pases de 40 segundos pues es suficiente). Nota: Si es un protector bucal con correa, deje la correa fuera del agua hervida.
2) Coloque el protector bucal en agua fría durante 1-2 segundos para evitar que se queme la boca (Consejo para que el agua caliente no le queme la boca a usted o a sus hijos).
3) Retire del agua. Coloque y alinee en su boca. (Consejo: Cuando muerda, use los pulgares y los dedos índice para sostener la capa externa y muévase lentamente hacia los dos extremos para asegurarse de que sus dientes se mantengan en el lugar correcto en la parte del gel).
4) Muerda el protector bucal y aspire el agua y el aire del mismo. Déjelo en la boca durante 10 segundos. (Consejo: Es seguro morder a través de la capa interna de gel).
5) Usar los dedos para presionar el protector bucal contra los dientes (Consejo para que también tenga más agarre en el costado).
6) Si no le queda bien, repita los pasos 1 a 5 de nuevo. (Consejo: Puede haber una curva de aprendizaje para algunos clientes/padres nuevos. Simplemente responde a este mensaje si podemos ser de ayuda.)
オーラルマート マウスガードの成型法
1. マウスガードを沸騰したお湯の中に40秒間 放置してください。(加熱しすぎにご注意ください。)
2. 箸などで熱湯からマウスガードを取り出し、 冷水に1~2秒間つけてください。
3. 冷水から取り出して、マウスガードの中心と自分の前歯の中心をしっかり合わせて口の中にいれてください。
4. ゆっくり噛みます。マウスガードと歯の間の空気を抜くように、水を吸います。そのまま10秒間噛み続けます。(親指と人差し指でマウスガードを持ち、奥歯までしっかりとマウスガードの内側の層上にあることを確認してから噛み始めてください。)
5. 前から(口の周り)指でマウスガードを 歯と歯茎にに当てるように押します。
6. フィットに違和感があるようなら、ステップ1から5を繰り返してください。
Learn How Other Customers Fit Oral Mart Sports Mouth Guard Perfectly
FAQs – How to Fit Mouth Guard to Get Snug Fit (Updating! More to Come!)
Are There Different Sizes?
Adult Size : 2.26 in. (W) x 2.15 in (L) x 0.81 in. (H)
Youth Size: 2.14 in. (W) x 1.78 in (L) x 0.73 in. (H)
Youth mouth guard is Mostly for Age 12 & Below
Adult mouth guard is Mostly for Age 13 & Up
Female adults with smaller mouth could go with youth size
FAQ #1: Kids mouth guards EXPAND after molding. (It may look small to you BEFORE molding. Please follow the step-by-step instruction.)
FAQ #2: The Size Suggestion by “Age” is “ESTIMATE”, which works for Most, “NOT” All, of our parents to decide if their youth athletes need an adult-size or youth-size. Kids aged between 11 and 15 could go either way. If you really can’t make a decision, please start with the youth one and see if it covers the molar teeth by the teeth marks on the inner gel. Also, female adults with smaller mouth could go with youth size too.
FAQ #3: For kids under 5 years old, dual-layer mouth guards may be too bulky. You may need to trim the ends of the kids mouth guard to make sure it fits comfortably and doesn’t irritate the back of your kid’s mouth (Yes! Extra work might be needed). Please consult your kids’ dentist before purchase.
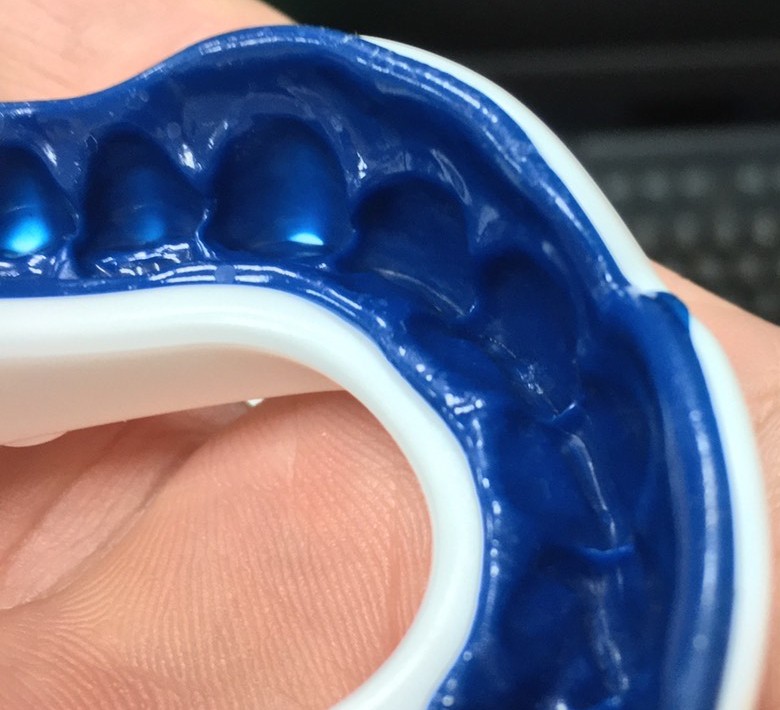
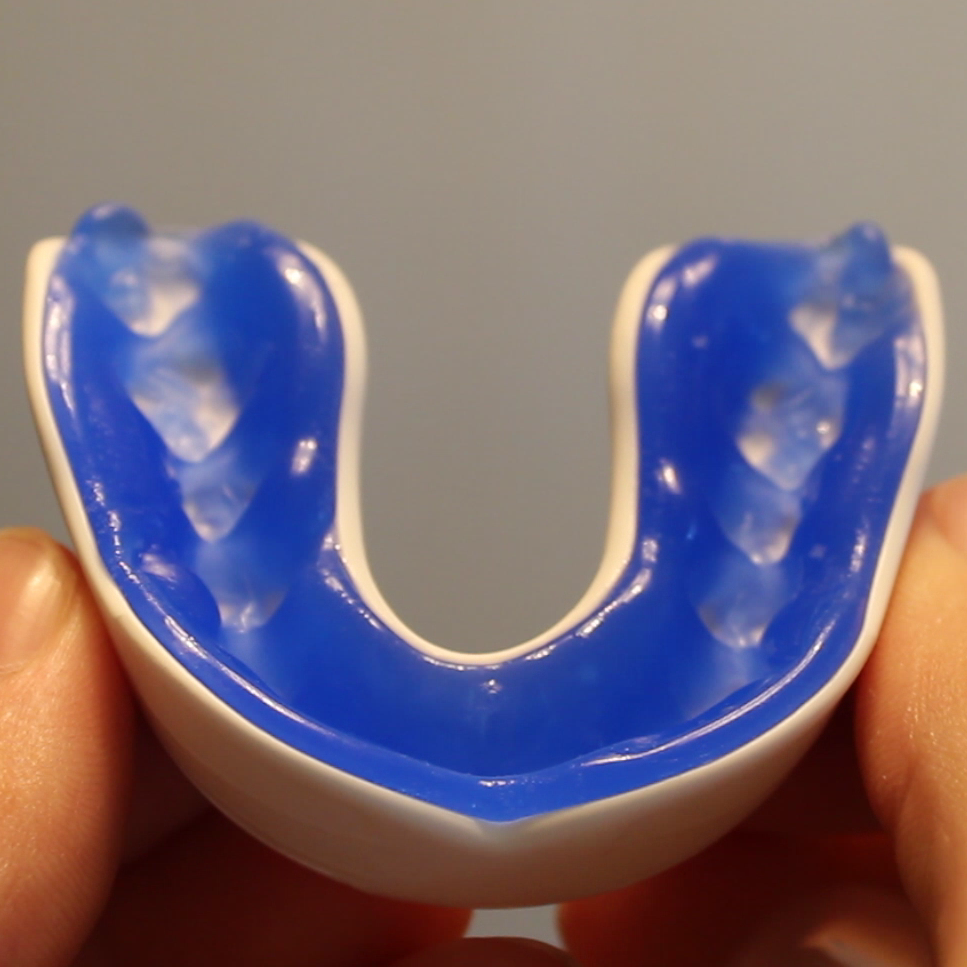
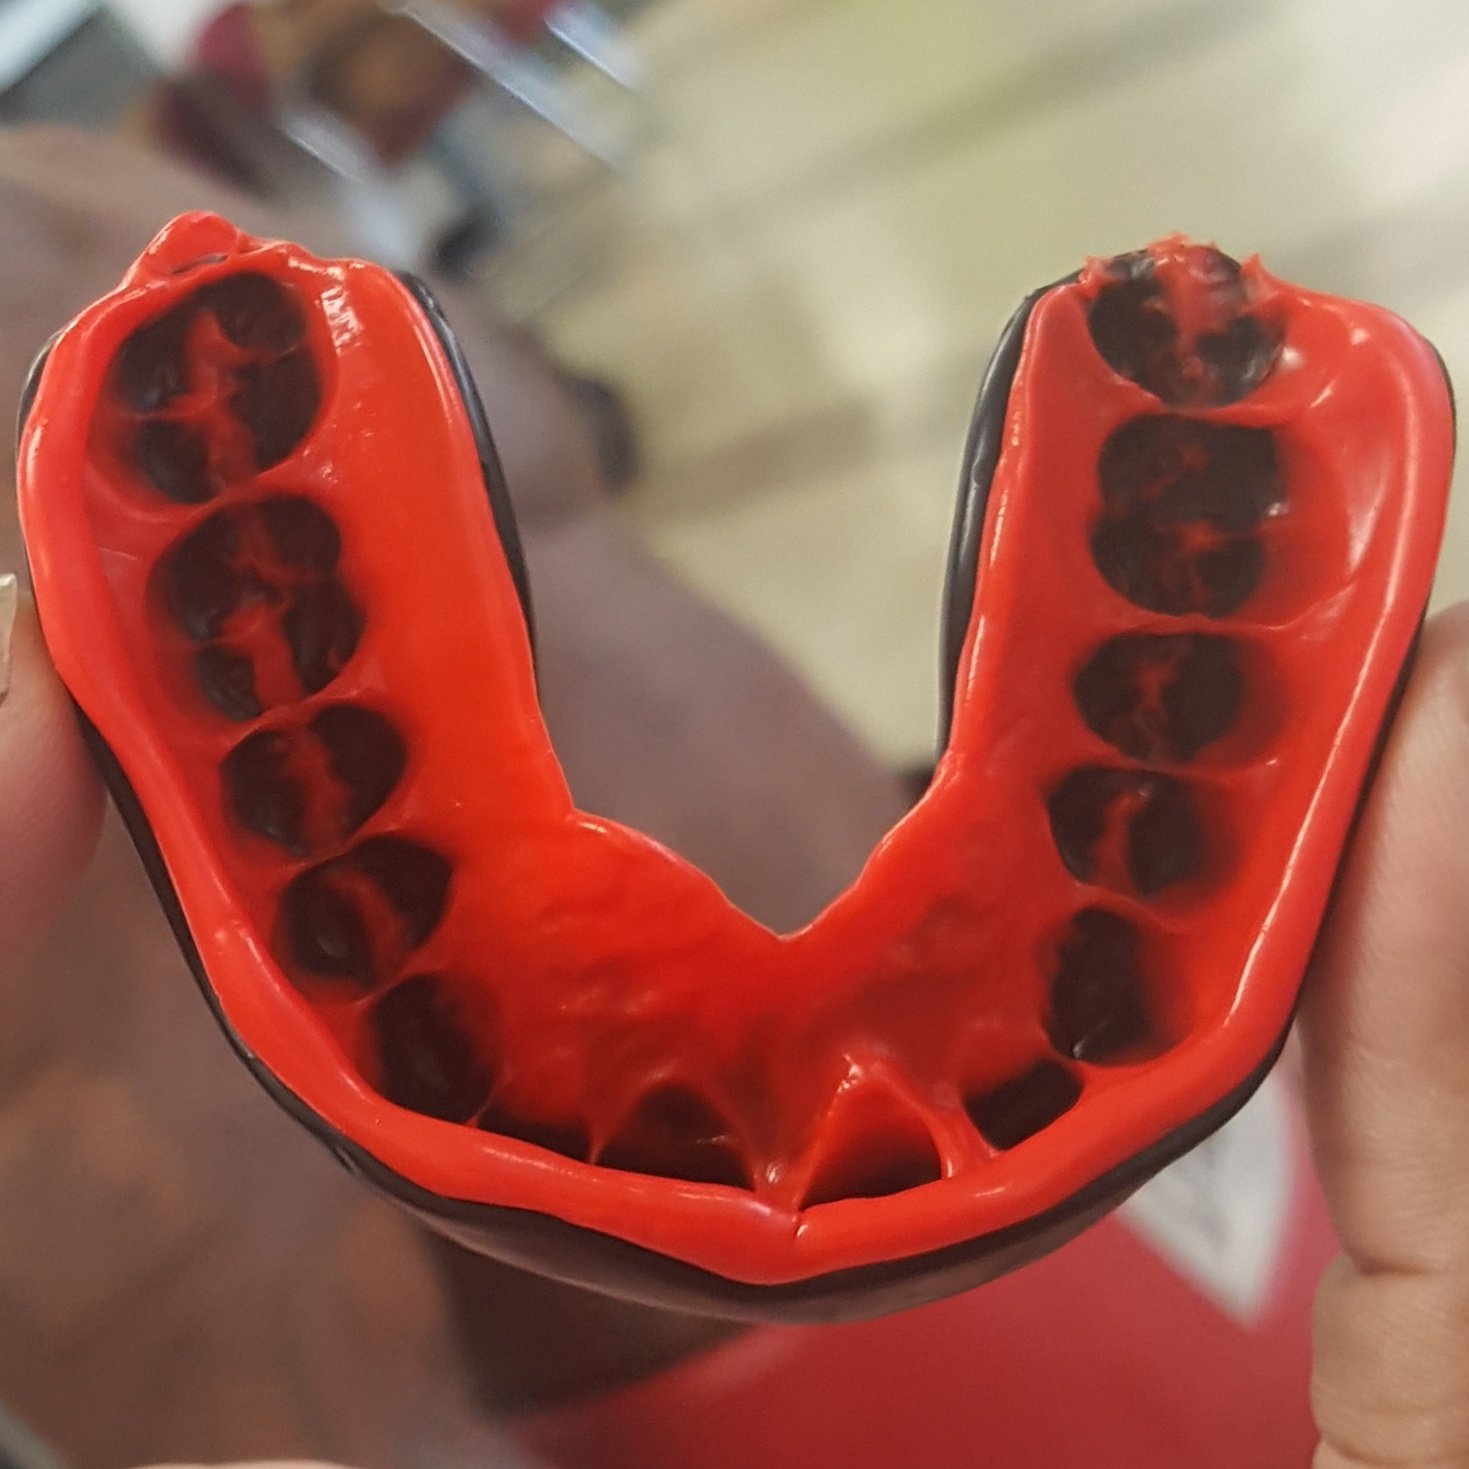
FAQ #4: The gap for the front teeth is narrow for tighter fit. The teeth marks don’t have to be exactly on the gap. As long as the teeth stay on the inner gel, it would be fine. After putting in the boiled water for 35 ~ 40 seconds, the inner gel will be very soft and ready to mold. You kid can easily bite through the small gap at the front.
Fitting Issue? Can’t Get Snug Fit?
Water was not hot enough. (Make sure you bring water to the boil before turning off the stove.)
Didn’t put mouth guard in the hot water long enough (35-40 seconds for Oral Mart mouth guard.) Note: MMA Champion Plus is thicker so it needs 50 seconds.
Put in cold water for too long. This step is to prevent a burning mouth. Putting the mouth guard in cold water for too long dramatically affect the fitting performance. Do a quick tap water dunk or wave in the air for at least a few seconds.
Other than biting deeper into the inner gel (It’s totally fine to bite through the inner gel.), please push the outer wall towards your upper teeth and gums to create more grips.
Here Are Our Promises!
Follow Us for New Designs


john fleischmann
Are there different sizes? Children-Adult s/m/l/xl?
Oral Mart
Hello John. Thank you for your question!
Yes! There are 2 different sizes.
Adult Size : 2.26 in. (W) x 2.15 in (L) x 0.81 in. (H)
Youth Size: 2.14 in. (W) x 1.78 in (L) x 0.73 in. (H)
Youth mouth guard is Mostly for Age 12 & Below
Adult mouth guard is Mostly for Age 13 & Up
Female adults with smaller mouth could go with youth size
FAQ #1: Kids mouth guards EXPAND after molding. (It may look small to you BEFORE molding. Please follow the step-by-step instruction.)
FAQ #2: The Size Suggestion by “Age” is “ESTIMATE”, which works for Most, “NOT” All, of our parents to decide if their youth athletes need an adult-size or youth-size. Kids aged between 11 and 15 could go either way. If you really can’t make a decision, please start with the youth one and see if it covers the molar teeth by the teeth marks on the inner gel. Also, female adults with smaller mouth could go with youth size too.
FAQ #3: For kids under 5 years old, dual-layer mouth guards may be too bulky. You may need to trim the ends of the kids mouth guard to make sure it fits comfortably and doesn’t irritate the back of your kid’s mouth (Yes! Extra work might be needed). Please consult your kids’ dentist before purchase.
FAQ #4: The gap for the front teeth is narrow for tighter fit. The teeth marks don’t have to be exactly on the gap. As long as the teeth stay on the inner gel, it would be fine. After putting in the boiled water for 35 ~ 40 seconds, the inner gel will be very soft and ready to mold. You kid can easily bite through the small gap at the front. (See “Before & After” picture below)
Hope this helps!